End-To-End Gender Determination by Morphometry of Eyes using CNN (Convolutional Neural Network)
Anthropometric analysis of the human face | baseline model |DPhi challenge August 2021 | Maximilien Kpizingui | Deep learning & IoT Engineer.


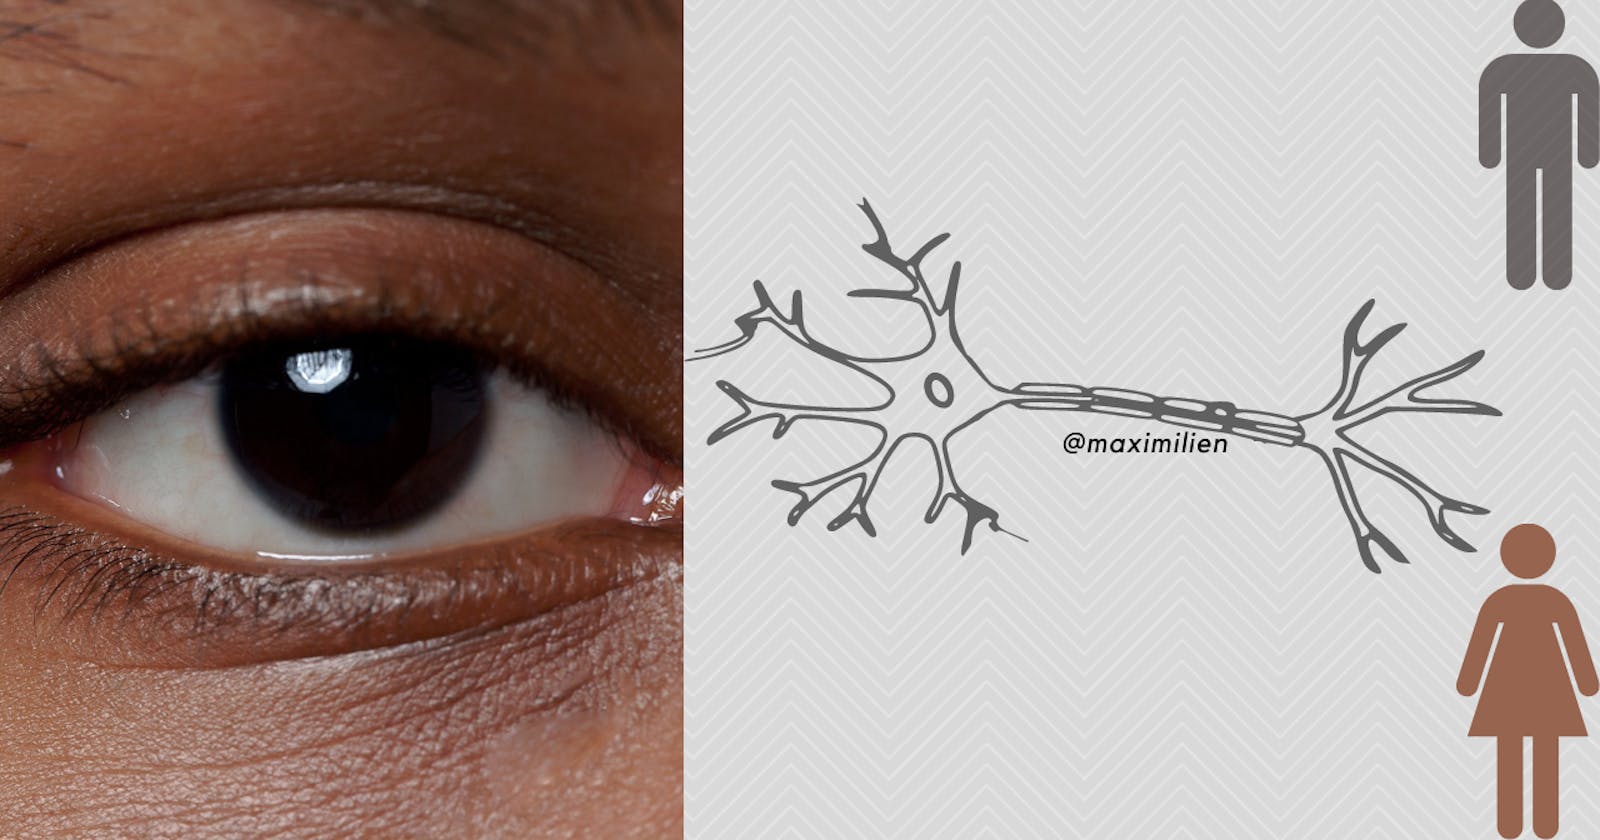
I did recall the first time my mum escorted me to nursery school. I was that little boy who used to learn from images written on flash cards hanging on the blackboard "this is a car", "this is an elephant" :-). Similarly in the following, we are going to build mathematical models to mimic the functions of a human eyes and brain to empower machine to classify image of an eye of a patient and to find out whether the patient is male or female.
Contents:
1. Computer vision
2. Convolutional Neural Network
3. Architecture of CNN
4. Image augmentation
5. Implementation of gender determination by morphometry of eye
1. Computer Vision
To understand computer vision, let us discuss human vision. Human vision is the ability of the human eye and brain to see and recognize objects. It is quite simple for the human eye to precisely identify whether a person is a male or a female but it takes a lot of training for a computer system to understand such objects distinctly. In other word, Computer vision is the process of giving a machine a similar task of seeing and identifying objects in the real world. In this optic, computer vision can be defined as building mathematical models that can mimic the function of a human eye and brain. Basically, it is about training computers to understand and process images and videos.
2. Convolutional Neural Network
CNN is a class of deep neural network that is mostly used in the field of computer vision and imaging. CNNs are used to identify images, cluster them by their similarity and implement object recognition. Moreover, The word convolution refer to the filtering process that takes place in the network. Finally, CNN has different layers namely the input layer, the output layer, and multiple hidden layers. Besides, these hidden layers of a CNN consist of fully connected layers, convolutional layers, a ReLU layer as an activation function, normalization layers and pooling layers.
3. Architecture of CNN
 The main components of CNN architecture are as follows:
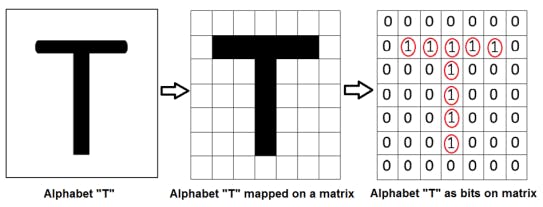
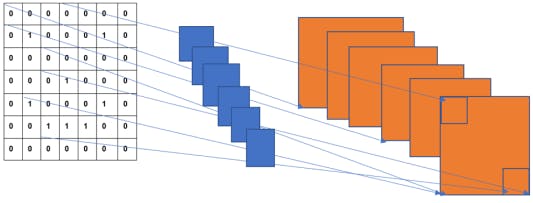
• Input image: An input image forms the first component of a CNN architecture. An image can be of any type: a human, an animal, scenery, a medical X-ray image etc. Each image is converted into a mathematical matrix of zeros and ones as following:
• Convolutional layer: The convolution layer is the place where the image processing or filtering starts. A convolution layer consists of two parts:
• Feature detector or filter or kernel: This is a matrix basically a a 3*3 matrix for 2D image you put on an image to transform it into a feature map
 • Feature map: This is the reduced image that is produced by the convolution of
an image and feature detector. We have to put the feature detector on all
the possible locations of the original image and derive a smaller image from it. That
derived image is the feature map of the input image obtained by the dot product of the input image with the kernel matrix.
• Feature map: This is the reduced image that is produced by the convolution of
an image and feature detector. We have to put the feature detector on all
the possible locations of the original image and derive a smaller image from it. That
derived image is the feature map of the input image obtained by the dot product of the input image with the kernel matrix.
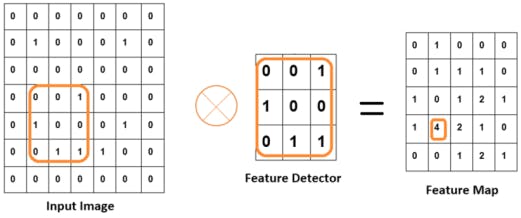
NB: The feature detector or kernel is the filter and the feature map is the reduced image. Some information is lost while reducing the image. The above feature map is obtained by moving the square orange frame all over the layer and taking the dot product with the kernel as shown below
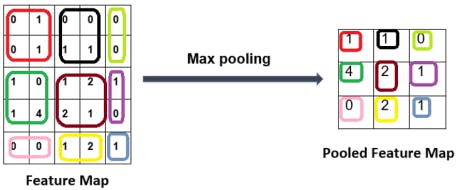
• Pooling layer: The pooling layer helps us ignore the less important data in the image and reduces the image further while preserving its important features. The feature map derived from the convolution layer is passed through a pooling layer to further reduce the image, all while preserving the most relevant part of the image. The pooling layer consists of functions such as max pooling, min pooling, and average pooling. What this means is that we select a matrix size, say 2x2 and we scan the feature map and select the maximum number from the 2x2 matrix that fits in that block. The following image gives us a clear idea of how max pooling works.
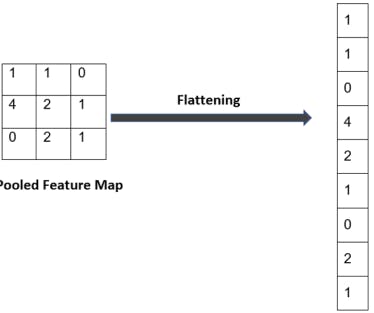
• Flattening: Flattening is part of a CNN where the image is made ready to use as an input to an artificial neural network. The pooled image is flattened and converted into a single column. Each row is made into a column and stacked one over another. Here, we have converted a 3x3 matrix into a 1xn matrix, where n in our case is 9.
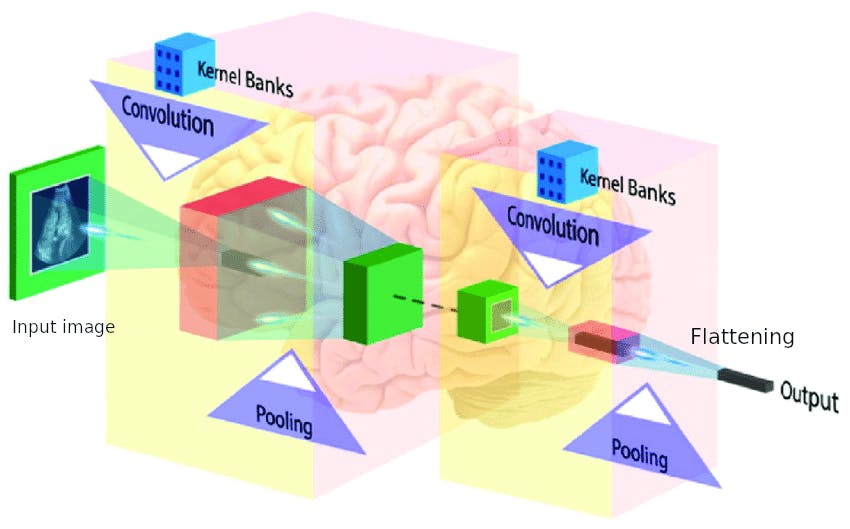
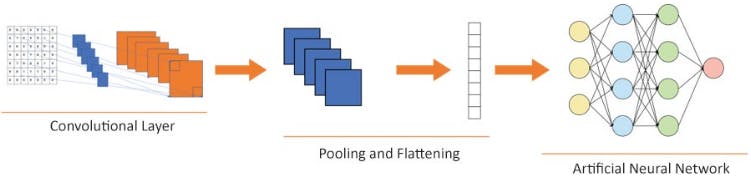
Now, let's look at the overall structure of a CNN
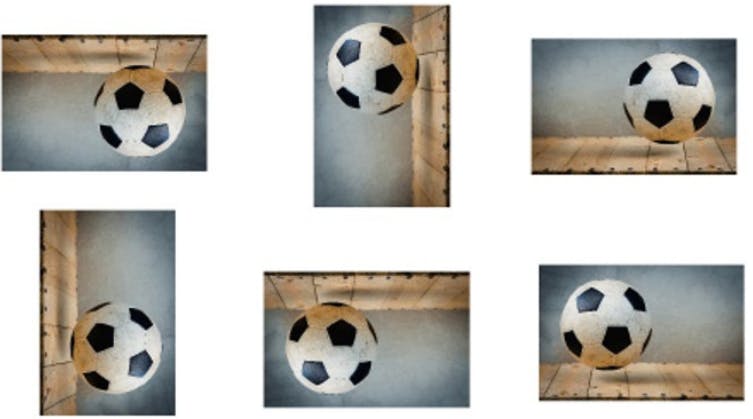
4. Image augmentation Image or data augmentation works in a similar manner. Image/data augmentation creates many batches of our images. Then, it applies random transformations to random images inside the batches. Data transformation can be rotating images, shifting them, flipping them, and so on. By applying this transformation, we get more diverse images inside the batches, and we also havemuch more data than we had originally like shown below for an image of a football.
5. Implementation of gender determination by morphometry of eye
Let's get into the coding part. The dataset used in this code can be downloaded from DPhi platform here .
- Installing tensorflow framework (skip this part if you are using Google colab)
# Requires the latest pip
 pip install --upgrade pip
# Current stable release for CPU and GPU
pip3 install tensorflow
#installing open computer vision
pip3 install opencv-contrib-python
Importing the libraries
from tensorflow.keras.preprocessing.image import ImageDataGenerator,array_to_img, img_to_array, load_img
from keras.layers import Dense, Activation, Flatten, Dropout, BatchNormalization
from keras.layers import Conv2D, MaxPooling2D
from tensorflow.keras import regularizers, optimizers
from keras.preprocessing import image
from tensorflow.keras.models import Sequential
import matplotlib.pyplot as plt
from os import listdir,makedirs
from os.path import isfile,join
from keras import layers
from keras import models
import pandas as pd
import numpy as np
import pathlib
import PIL
import cv2
import os
Loading the train and test dataset
train_df=pd.read_csv("Training_set.csv",dtype=str)
test_df=pd.read_csv("Testing_set.csv",dtype=str)
- Defining the path for the various directories
src_path_train="/root/Desktop/Deep learning dphi/eye_gender_data/train/" src_path_test="/root/Desktop/Deep learning dphi/eye_gender_data/test/" src_path_validation="/root/Desktop/Deep learning dphi/eye_gender_data/train/validation/" src_path_train_gray="/root/Desktop/Deep learning dphi/eye_gender_data/train_grayscale/" src_path_test_gray="/root/Desktop/Deep learning dphi/eye_gender_data/test_grayscale/"base_dir='/root/Desktop/Deep learning dphi/eye_gender_data/' validation_dir = os.path.join(base_dir, 'validation') os.mkdir(validation_dir)validation_dir = os.path.join(src_path_train_gray, 'train_grayscale') os.mkdir(validation_dir)validation_dir = os.path.join(src_path_test_gray, 'train_grayscale') os.mkdir(validation_dir)
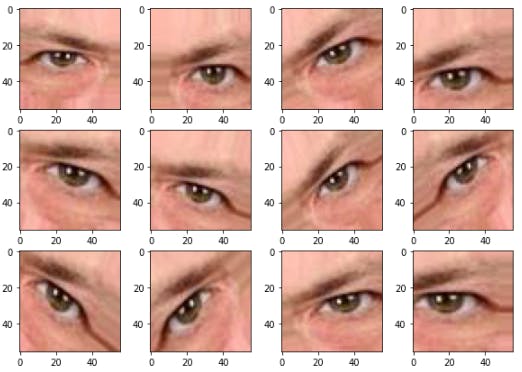
Applying data augmentation to Image_6 in the train dataset to visualize how it looks like
datagen = ImageDataGenerator(
        rotation_range=40,
        width_shift_range=0.2,
        height_shift_range=0.2,
        shear_range=0.2,
        zoom_range=0.2,
        horizontal_flip=True,
        fill_mode='nearest')

img = load_img("/root/Desktop/Deep learning dphi/eye_gender_data/train/Image_6.jpg")  # this is a PIL image
x = img_to_array(img)  # this is a Numpy array with shape (3, 150, 150)
x = x.reshape((1,) + x.shape)  # this is a Numpy array with shape (1, 3, 150, 150)

# the .flow() command below generates batches of randomly transformed images
# and saves the results to the `preview/` directory
i = 0
for batch in datagen.flow(x, batch_size=1,
                          save_to_dir='preview', save_prefix='cat', save_format='jpeg'):
    i += 1
    if i > 12:
        break  # otherwise the generator would loop indefinitely
Creating a function to visualize 12 augmented samples of a real image
def visualizeImg(path,color):
    sub_class = os.listdir(path)
    fig = plt.figure(figsize=(10,7))
    for e in range(len(sub_class[:12])):
        plt.subplot(3,4,e+1)
        img = plt.imread(os.path.join(path,sub_class[e]))
        plt.imshow(img, cmap=plt.get_cmap(color))
- Visualizing the augmented images
visualizeImg("/root/Desktop/Deep learning dphi/eye_gender_data/preview/",'CMRmap')
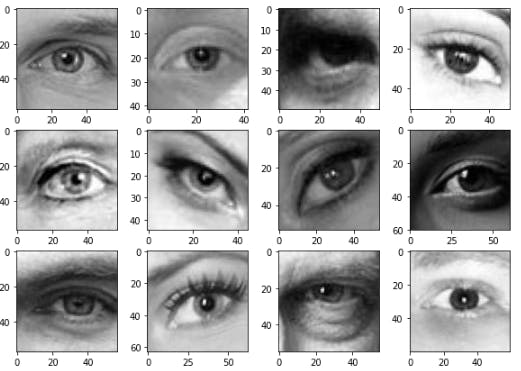
- Displaying sample of the train dataset
visualizeImg(src_path_train,'CMRmap')
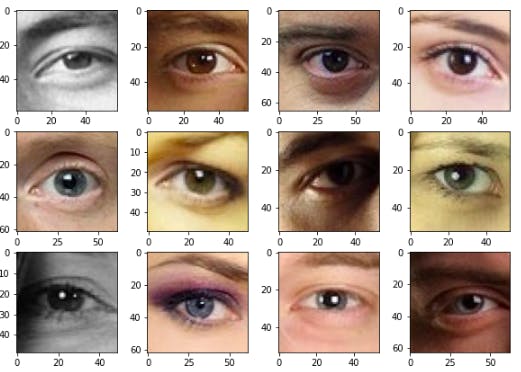
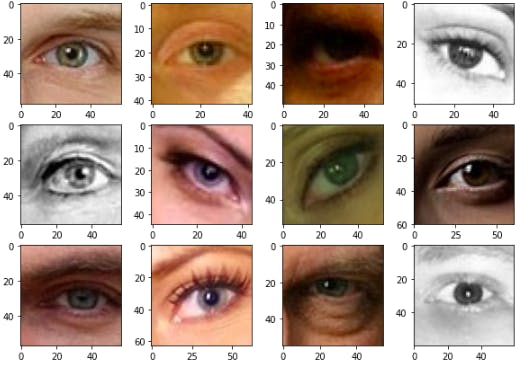
- Displaying sample of test dataset
visualizeImg(src_path_test,'CMRmap')
- Converting the train dataset to grayscale instead
path ="/root/Desktop/Deep learning dphi/eye_gender_data/train/"
#create a folder named  train_grayscale in the eye_gender data directory
dstpath ="/root/Desktop/Deep learning dphi/eye_gender_data/train_grayscale/"

try:
    makedirs(dstpath)
except:
    print ("Directory already exist, images will be written in same folder")

# Folder won't used
files = [f for f in listdir(path) if isfile(join(path,f))]

for image in files:
    try:
        img = cv2.imread(os.path.join(path,image))
        gray = cv2.cvtColor(img,cv2.COLOR_BGR2GRAY)
        dstPath = join(dstpath,image)
        cv2.imwrite(dstPath,gray)
    except:
        print ("{} is not converted".format(image))
- displaying sample of train_grayscale dataset
visualizeImg(src_path_train_gray,'gray')

- Converting test to grayscale
path ="/root/Desktop/Deep learning dphi/eye_gender_data/test/"
#create a folder named  test_grayscale in the eye_gender data directory
dstpath ="/root/Desktop/Deep learning dphi/eye_gender_data/test_grayscale/"

try:
    makedirs(dstpath)
except:
    print ("Directory already exist, images will be written in same folder")

# Folder won't used
files = [f for f in listdir(path) if isfile(join(path,f))]

for image in files:
    try:
        img = cv2.imread(os.path.join(path,image))
        gray = cv2.cvtColor(img,cv2.COLOR_BGR2GRAY)
        dstPath = join(dstpath,image)

        cv2.imwrite(dstPath,gray)
    except:
        print ("{} is not converted".format(image))
- Displaying sample of test_grayscale dataset
visualizeImg(src_path_test_gray,'gray')
- Defining the augmentation configuration we will use for training
train_datagen = ImageDataGenerator(
        rescale=1 / 255.0,
        rotation_range=2,
        zoom_range=0.05,
        width_shift_range=0.05,
        height_shift_range=0.05,
        shear_range=0.05,
        horizontal_flip=True,
        fill_mode="nearest",
        validation_split=0.20)
- Defining the augmentation configuration we will use for testing
test_datagen = ImageDataGenerator(rescale=1./255)
This is a generator that will read pictures found in subfolers of 'eye_gender_data/train_grayscale', and indefinitely generate batches of augmented image data
train_generator = train_datagen.flow_from_dataframe(
    dataframe=train_df,
    directory=src_path_train_gray,
    x_col="filename",
    y_col="label",
     subset='training',
    target_size=(71, 71),  # all images will be resized to 71*71
    batch_size=400,
    seed=60,
    shuffle=True,
   class_mode='categorical')
Found 7376 validated image filenames belonging to 2 classes.
- This is a generator that will read pictures found in subfolers of 'eye_gender_data/test_grayscale', and indefinitely generate batches of augmented image data
test_generator = test_datagen.flow_from_dataframe(
    dataframe=test_df,
    directory="/root/Desktop/Deep learning dphi/eye_gender_data/test_grayscale/",
    x_col="filename",
    target_size=(71, 71),
    batch_size=1,
    class_mode=None,
    seed=60,
    shuffle=False,
)
- Defining the function base_model contained the sequential model and all the connected layers
def base_model():
    model = models.Sequential()
    model.add(layers.Conv2D(32, (3, 3),padding='same', activation='relu',input_shape=(32, 32, 3)))
    model.add(layers.MaxPooling2D((2, 2)))
    model.add(Dropout(0.25))
    model.add(layers.Conv2D(64, (3, 3), padding='same', activation='relu'))
    model.add(layers.MaxPooling2D((2, 2)))
    model.add(Dropout(0.25))
    model.add(layers.Conv2D(64,(3, 3),padding='same' , activation='relu'))
    model.add(layers.MaxPooling2D((2, 2)))
    model.add(Dropout(0.25))
    model.add(layers.Conv2D(64, (3, 3), padding='same',activation='relu'))
    model.add(layers.MaxPooling2D((2, 2)))
    model.add(Dropout(0.25))
    model.add(layers.Flatten())
    model.add(layers.Dense(512, activation='relu'))
    model.add(Dropout(0.5))
    model.add(layers.Dense(2, activation='softmax'))
    return model
- Compiling the baseline model
baseline=base_model()
baseline.compile(optimizer='adam',loss="categorical_crossentropy",metrics=["accuracy"])
- Fitting the baseline model in 5 epoch
STEP_SIZE_TRAIN=train_generator.n//train_generator.batch_size
STEP_SIZE_VALID=valid_generator.n//valid_generator.batch_size
STEP_SIZE_TEST=test_generator.n//test_generator.batch_size
history= baseline.fit(train_generator,
                    steps_per_epoch=STEP_SIZE_TRAIN,
                    validation_data=valid_generator,
                    validation_steps=STEP_SIZE_VALID,
                   epochs=5)

- Creating a folder to save the model
!mkdir -p saved_model
baseline.save('saved_model/my_model')
- Evalualing the model on validation dataset
score = baseline.evaluate(valid_generator,steps=STEP_SIZE_TEST)
print('Test loss:', score[0])
print('Test accuracy:', score[1])

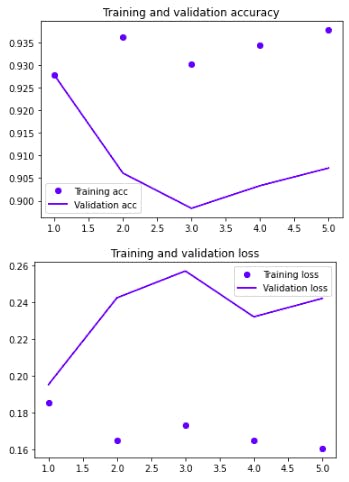
- Plotting Training and validation accuracy & Training and validation loss
import matplotlib.pyplot as plt
acc = history.history['accuracy']
val_acc = history.history['val_accuracy']
loss = history.history['loss']
val_loss = history.history['val_loss']
epochs = range(1, len(acc) + 1)
plt.plot(epochs, acc, 'bo', label='Training acc')
plt.plot(epochs, val_acc, 'b', label='Validation acc')
plt.title('Training and validation accuracy')
plt.legend()
plt.figure()
plt.plot(epochs, loss, 'bo', label='Training loss')
plt.plot(epochs, val_loss, 'b', label='Validation loss')
plt.title('Training and validation loss')
plt.legend()
plt.show()
- Loading the save model
new_model = models.load_model('saved_model/my_model')
- Predicting the test dataset
STEP_SIZE_TEST=test_generator.n//test_generator.batch_size
test_generator.reset()
prediction=new_model.predict(test_generator,steps=STEP_SIZE_TEST,verbose=1)
Naming the columns of the prediction labels and re-ordering the indices of the prediction .
predicted_class_indices=np.argmax(prediction,axis=1)
labels = (train_generator.class_indices)
labels = dict((v,k) for k,v in labels.items())
predictions = [labels[k] for k in predicted_class_indices]
filenames=test_generator.filenames
creating a dataframe containing the prediction
results=pd.DataFrame({ "label":predictions})
- Displaying the prediction in a dataframe
results

- Saving the prediction in csv file
results.to_csv("submission.csv",index=False)
kudos for reaching at this point, you can submit your submission file in csv format to any platform such as kaggle , DPhi, hackerrank, hackerearth for marking.
- Classifying a new unseen image
You have your deep learning model up now you can ahead take a picture of people's eyes randomly with your phone and run the prediction to determine the gender of the person. How to go by it? check the following
- Loading the new image save in the directory of your choice as below
new_image = image.load_img('/root/Desktop/Deep learning dphi/eye_gender_data/unseen_test/download.jpeg', target_size = (71, 71))
- Converting the image to grayscale.
#converting train to grascale
path ="/root/Desktop/Deep learning dphi/eye_gender_data/unseen_test"
#create a folder named  train_grayscale in the eye_gender data directory
dstpath ="/root/Desktop/Deep learning dphi/eye_gender_data/unseen_test_grayscale/"

try:
    makedirs(dstpath)
except:
    print ("Directory already exist, images will be written in same folder")

# Folder won't used
files = [f for f in listdir(path) if isfile(join(path,f))]

for image in files:
    try:
        img = cv2.imread(os.path.join(path,image))
        gray = cv2.cvtColor(img,cv2.COLOR_BGR2GRAY)
        dstPath = join(dstpath,image)
        cv2.imwrite(dstPath,gray)
    except:
        print ("{} is not converted".format(image))
- Visualizing the image
plt.imshow(gray,cmap="gray")
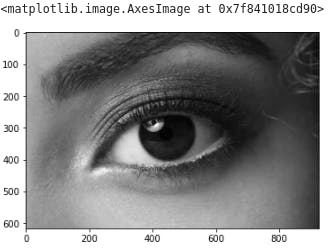
- Checking the shape of the image because the input image to our sequential model is 32 by 32
gray.shape
(617, 926)
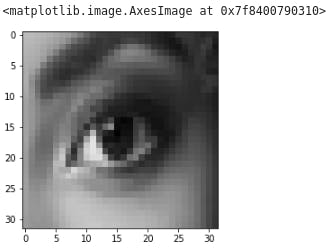
- Resizing the image to (32,32)
from keras.preprocessing import image
from keras.preprocessing.image import img_to_array
image = image.load_img("/root/Desktop/Deep learning dphi/eye_gender_data/unseen_test_grayscale/download.jpeg")
image = image.resize((32,32))
plt.imshow(image)
- Converting the image to an array
new_image =img_to_array(image, dtype='uint8')
new_image = np.expand_dims(new_image, axis = 0)
- Running the prediction
STEP_SIZE_TEST=test_generator.n//test_generator.batch_size
prediction=new_model.predict(new_image)
- Viewing the class labels
train_generator.class_indices
{'female': 0, 'male': 1}
- Checking the label of the unseen image
if prediction[0][0] == 1:
    new_image = 'This is a male'
else:
    new_image = 'This is a female'
print(new_image)
This is a female
Conclusion:
We reach the end of our learning journey in convolutional neural network to determine the gender by morphometry of eyes with 93% accuracy. We can increase the accuracy of the model by using pre-trained models such Residual Network (ResNet50), VGG16, Xception, Deep Residual Network (DensetNet) or Inception to reach 98% or 99% with few line of codes.
Please subscribe to my newsletter and never miss my upcoming articles and leave me a comment if you have any questions or find this post interesting.
My regards,
Maximilien.